
Yesterday’s big game was a fitting end to a great campaign. The British smashed through the German defenses and broke out of Arnhem. Here is the battle report.


According to the brief, XXX Corps had reached Arnhem in force, crossing to the north side of the river and joining with the remaining 1st Airborne Division troops. This combined force was ordered to push out of the battered bridgehead and break out of Arnhem to the ENE. The German defenders, consisting of three SS infantry battalions supported by a company of King Tiger tanks, were ordered to stop any breakout.


Terrain: The terrain on the 11 X 5 foot table was based on contemporary maps and aerial photographs. The Neder Rijn River ran just off the southern edge of the table, and the Ijssel Rijn River ran along most of the eastern edge. The western end of the table depicted the destroyed area of the city around the northern ramp of the Arnhem Road Bridge. The middle of the table held the rail yard and the more intact sections of the city. The eastern half of the table was mostly open polder land crossed by a main road on a dike and several secondary roads, with a factory complex near the river. About 12 inches in from the northern edge of the table, a high railway embankment ran from the western to the eastern edges. The five underpasses under the railway were the Objectives — the capture of any one of these would enable the British to break out of the city into the open country beyond.


(Note: The railway embankment was shown on the table with a cork underlay beneath the tracks, and the dike road was shown with low hedges along the road. Both of these features blocked ground level line of sight across them. Vehicles could only move on roads or on the open portions of city blocks.)


German Forces: The defending German forces were described as three battalions of SS infantry with a Tiger company and three battalions of off-board artillery in support. Running the game at 1/3 scale (so a platoon on the table represented three platoons in the campaign), this provided three SS infantry companies with a total of 9 platoons, 12 HMGs, 3 PaK40 ATGs, 8.0 cm mortar battery, 6 King Tigers, one 15.0 cm battery, and two 10.5 cm batteries. The infantry had panzerfausts and three panzerschreck teams. All were rated Fearless Veteran.


British Forces: The attacking British forces were described as three battalions of Para infantry at half strength, one Guards armored regiment at half strength, one infantry brigade at half strength, plus one more Guards armored regiment at full strength, and one more infantry brigade at full strength, with off board artillery support (still limited by ammunition shortages) In the game, at 1/3 scale, this massive force was represented by two Para companies with 6 platoons and one assault platoon (and no other support), six Infantry companies with 18 platoons, HMGs and 3″ mortar support, one half-sized Armored company with 10 mixed Shermans, one full Armored company with 16 mixed Shermans, two 25-pdr batteries and one 5.5″ battery. The paras were rated Fearless Veteran and the others were rated as Confident Veteran.


German Deployment: The Germans placed six infantry platoons, the mortar battery and two Pak40 ATGs in the urban ruins around the British bridgehead to defend Objectives One and Two. Two more platoons were dug into the polder fields behind the railway embankment to defend Objectives Three and Four. One platoon and one PaK40 were in the factory complex near the dike road, defending the route to Objective Five. The six King Tigers were placed in pairs outside of town along the eastern edge of the city, in positions where they could fire down the streets or move to defend the dike road across the polder.


British Deployment and Plan: The British concentrated all six of the para platoons to the NNW of the bridge. Their task was to assault and turn the German right flank, then continue to advance along the railway to capture Objective One. Nine platoons of regular infantry deployed to the ENE of the bridge. Their task was to move through the undefended rail yard to turn the German left flank, while keeping pressure on the German center to eventually threaten Objective One and Objective Two. Nine more infantry platoons were in reserve near the bridge, to be used as a breakthrough force where needed. The half-company of Shermans was in the lead on the road beneath the bridge, tasked with moving into the town to support the infantry attacks. The full company of Shermans was on the road behind them, tasked with moving out of the city along the dike road to the east to threaten Objective Five, with the expectation that they would draw the King Tigers away from the city. The tower of St. Eusebius church provided the British FO with an excellent vantage point.


Battle Report: On Turn 1, British artillery and mortars started to soften up the German defenders near Objective One. This bombardment would continue with varying force throughout the game. The British paras launched a series of close assaults, which swiftly cleared one block and, most importantly, captured the large, damaged house on the German right flank. The leading British infantry moved into the undefended rail yard. The Shermans started rolling, but their movement was slowed by debris on the road In their turn, the Germans answered with their artillery and mortars and held their ground. Critically, they did not shift any troops to reinforce their threatened right flank.


On Turn 2, the leading paras bounded over the rail line into the undefended row houses on the German baseline. The Germans responded to this clear threat to their right by pivoting their right hand platoon to occupy the last row house in the block. This provided a small but solid core of resistance that temporarily stopped the paras’ turning movement.


On Turn 3, the British infantry launched an assault out of the rail yard into the ruins across the street. With the support of a smoke bombardment, the British closed with the SS defenders, but then lost the melee and were thrown back. However, this was only a temporary set back, and the British cleared the block of ruins on the following turn, and also moved into some of the undefended row houses to the north of the rail yard. This prompted the Germans to shift a platoon to occupy the other houses in that block, which halted the British advance in that sector. The German defenses in the city were now stretched very thin.


On Turns 4 and 5, combined assaults by the British paras and infantry cleared one more block of ruins in the center, with the half-company of Shermans in the city providing supporting fires. The full company of Shermans reached the dike road, and attracted the attention of four King Tigers. Two of these Tigers would later move to block the British armored thrust along the dike road. Only a well-timed smoke screen limited British tank losses. The other two Tigers took long range shots at the Shermans in town, killing three, and then slowly moved into the city but arrived too late to make a difference at the objectives there.


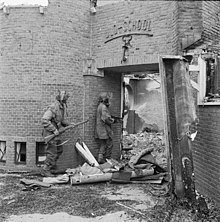
On Turn 6 the British attack on the German right flank regained its impetus. The para assault platoon had come forward with its flamethrower, and pinned the German platoon holding the row house behind the rail line. The first British assault was annihilated by a German counterassault, but a fresh British platoon continued the assault, and wiped out the Germans in turn. Only one more block of buildings stood between the British and Objective One. The Germans were left with very little with which to hold this last redoubt.


Turns 7 and 8 saw the British artillery finishing off the last of the German defenders in front of Objective One, and British paras and infantry moving to occupy the now vacant ruins. Meanwhile the paras assaulted with overwhelming force and took the last block of buildings behind Objective One. The Germans had nothing that could counterattack to contest the objective. The game was over!

- TJ